Brake lights are essential for keeping yourself and other drivers safe on the road. Burned out brake light bulbs are common, so it’s important to replace them quickly in order to avoid costly tickets or accidents.
Replacing a brake light isn’t particularly difficult and only requires basic tools. But be sure to consult your owner’s manual for step-by-step instructions on how to do so.
🎯Suggested article: 2021 Kia Sportage Brake Light Bulb Replacement
1. Identify the Bulb
Brake lights are essential for alerting other drivers that you are braking, but they can be hard to see when dirty or covered with dirt. To improve visibility, clean the bulbs regularly; however, if this doesn’t improve things enough, it may be time for a replacement bulb.
Many vehicles feature a single light bulb that serves both functions of a turn signal and rear brake light. On other vehicles, however, there may be separate brake and turn signal bulbs.
Before you can replace a bulb, you must determine its type and locate an exact replacement. Your retailer’s online or in-store interface should help you locate the correct bulb for your vehicle.
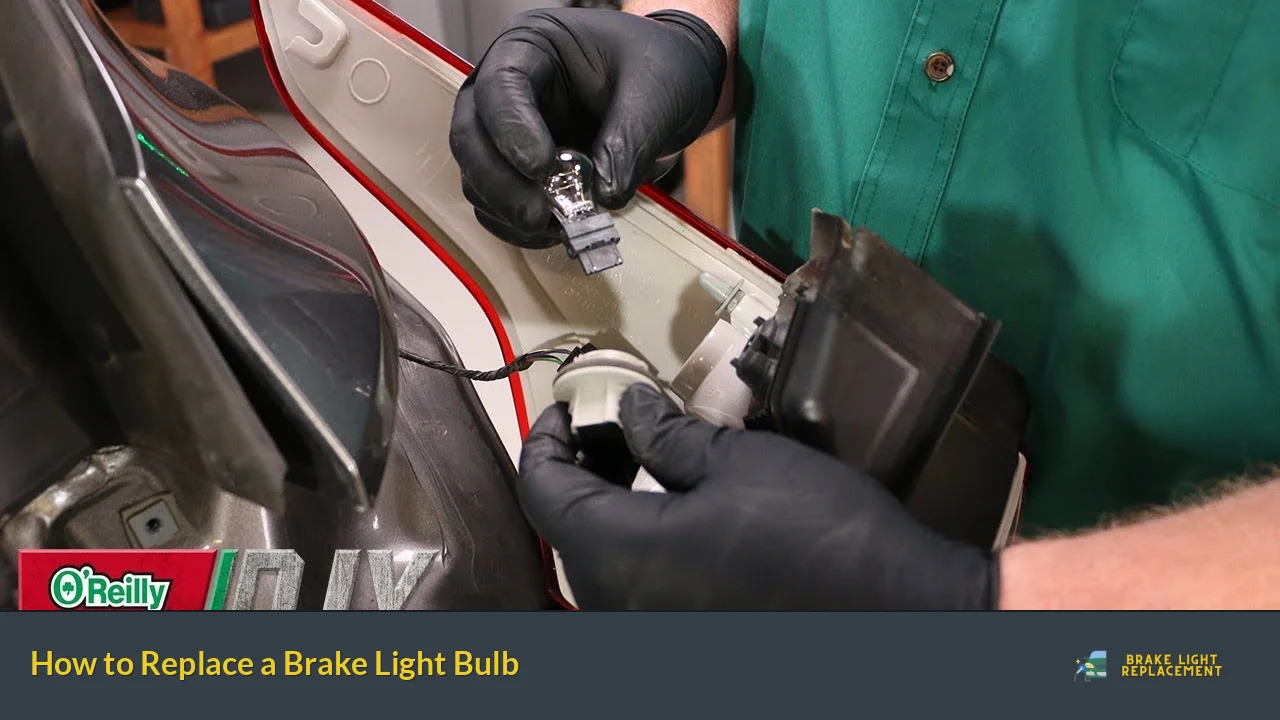
Once the taillight housing has been taken off, pull out the light bulb assembly (if it hasn’t already been taken out). Most bulbs should come out without needing any twisting; however, some may require a quarter turn for proper removal.
🚨You may be interested in: Why a Brake Light Bulb Replacement is Important for Your 2016 Nissan Rogue
2. Remove the Taillight Housing
Your car’s brake light is an important safety component that serves to alert following vehicles when you slow or stop. Unfortunately, the bulb may burn out eventually, so be sure to replace it as soon as possible.
Altering your brake lights is a relatively straightforward and budget-friendly DIY project. The first step in the process is locating the correct bulb for your vehicle.
Next, use a screwdriver to extract the taillight housing from its mounting. This housing may be located inside your trunk or hatchback, depending on which model.
3. Remove the Old Bulb
Brake lights are an integral safety measure in any vehicle. They let drivers behind you know when you’re slowing down, as well as alerting other road users of your presence.
If your brake light bulb has failed, it’s time to replace it. Fortunately, changing a brake light is usually an easy DIY project that anyone can do on their own.
To remove the old bulb, you’ll need needle-nose pliers. Carefully insert them as far into the base as possible and gently bend it inward but not enough to break the fixture. Finally, turn counterclockwise; you may encounter resistance during this process.
4. Apply Dielectric Grease
To prevent corrosion and make changing the bulb easier, apply some dielectric grease to the end before screwing in the new one. After that’s done, you can quickly install your replacement bulb, attach the taillight housing, and get back out on the road!
Dielectric grease is an incredibly useful substance that can be applied to various electrical connections, such as battery terminals, spark plugs, and other automotive parts. Not only does it extend the life of these components but it also reduces voltage drop during inclement weather conditions.
5. Install the New Bulb
When your brake light bulb fails, it is essential to replace it promptly. These bulbs serve as warnings to other motorists that you are braking or slowing down.
Additionally, brake lights offer extra visibility during low-visibility conditions like snowstorms or foggy mornings. Altering brake lights is a simple repair project that should take no more than a few minutes depending on your car model.
🎯Suggested article: 2013 Mini Cooper Brake Light Bulb Replacement
The initial step in replacing a lightbulb for your Toyota vehicle is identifying what kind of bulb it requires. Your owner’s manual usually provides guidance here, but if not, our top-notch parts center can assist you in finding the correct bulb for your Toyota car or truck.