Are you tired of driving around with a faulty third brake light on your Range Rover? Don’t worry, because we’ve got you covered! In this article, we will guide you through the process of replacing your Range Rover’s third brake light, ensuring that you can hit the road with confidence and safety.
The third brake light, also known as the center high-mounted stop lamp (CHMSL), is an essential component of your vehicle’s lighting system. It serves as a crucial indicator for other drivers, alerting them when you’re braking. A malfunctioning third brake light not only compromises your safety but also puts you at risk of receiving a traffic citation.
So, how do you go about replacing the third brake light on your Range Rover? The first step is to gather the necessary tools for the job. You’ll typically need a screwdriver, a socket wrench, and a replacement bulb or LED module. It’s always a good idea to consult your vehicle’s manual for specific instructions and recommendations.
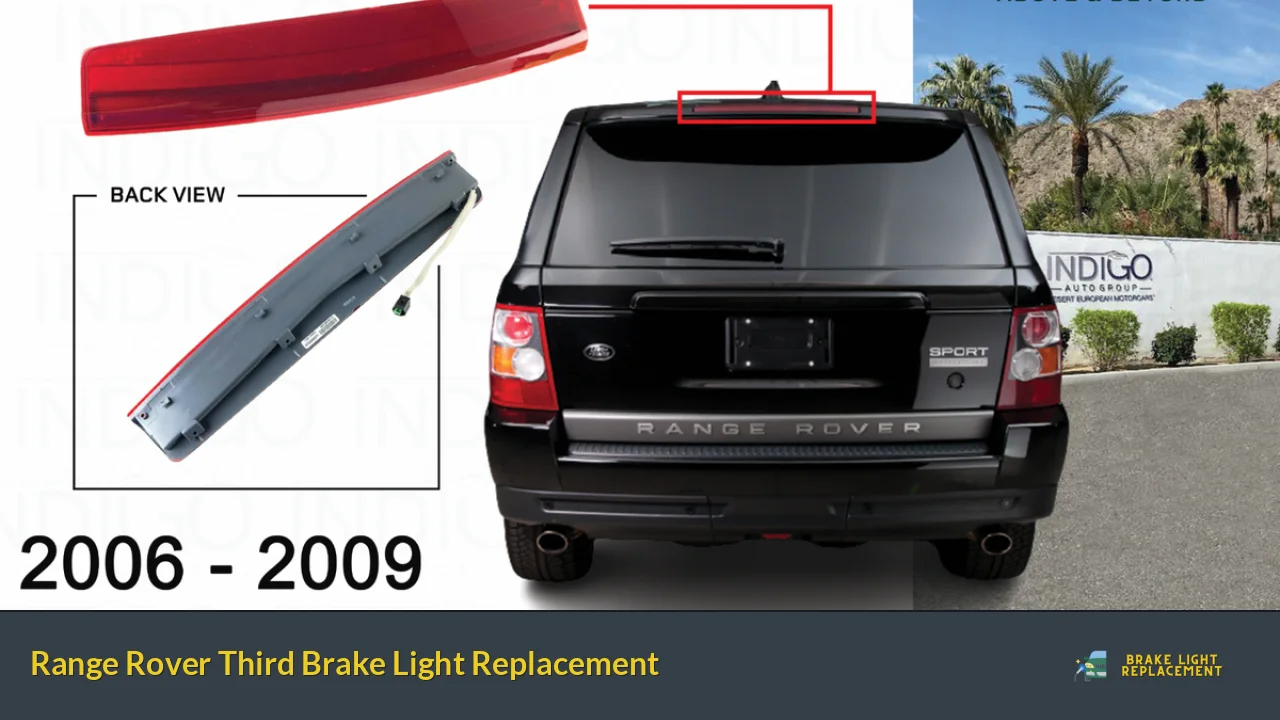
To begin, locate the third brake light housing on the rear of your Range Rover. This housing is usually situated at the top of the rear windshield. Once you’ve found it, carefully remove the screws or bolts securing the housing in place. Gently pry the housing away from the vehicle, being mindful not to damage the paint or surrounding components.
With the housing removed, you’ll have access to the old third brake light. Depending on the model of your Range Rover, you may need to unscrew the bulb from its socket or unclip the old LED module. Take note of the orientation of the old light to ensure proper installation of the new one.
Now it’s time to install the replacement light. Insert the new bulb into the socket or attach the new LED module, following the reverse steps of removal. Double-check that the light is securely fastened and properly aligned. Once you’re satisfied, reattach the housing to your Range Rover by tightening the screws or bolts.
Finally, test the newly installed third brake light. Press the brake pedal to ensure that it illuminates correctly. If everything is in working order, you can breathe a sigh of relief knowing that you’ve successfully replaced your Range Rover’s third brake light.

Replacing the third brake light on your Range Rover is a relatively straightforward process that can significantly enhance your safety on the road. By following the steps outlined in this article and taking the time to do the job right, you’ll be back on the road with a fully functional and eye-catching third brake light. Drive safely!
Revamp Your Ride: Expert Tips on Range Rover Third Brake Light Replacement
Are you tired of driving around with a malfunctioning third brake light on your Range Rover? It’s time to revamp your ride and ensure safety on the road. In this article, we will provide you with expert tips on Range Rover third brake light replacement, so you can restore the functionality and aesthetics of your vehicle.
Replacing the third brake light on your Range Rover is a relatively simple task that you can easily do yourself. First, gather the necessary tools: a screwdriver, a trim panel removal tool, and a new third brake light assembly specifically designed for your Range Rover model.
To begin the replacement process, locate the third brake light housing on your vehicle. It is typically positioned at the center of the rear windshield, above the rear window wiper. Using the trim panel removal tool, gently pry off the housing cover to access the bulb and wiring.
Next, carefully disconnect the electrical connector attached to the brake light bulb. This can usually be done by pressing down on a small tab or lever. Once the connector is detached, remove the old bulb from the socket. Inspect the bulb for any signs of damage or wear and replace it if necessary.
Now, it’s time to install the new third brake light assembly. Insert the new bulb into the socket, making sure it is securely in place. Then, reconnect the electrical connector to the bulb by aligning the tab or lever and pressing it firmly until it clicks into position.
Before reattaching the housing cover, test the newly installed third brake light to ensure it is functioning correctly. Have someone press the brake pedal while you observe the light from outside the vehicle. If it illuminates properly, you’re good to go!
Finally, snap the housing cover back into place, ensuring all clips are secure. Give it a gentle tug to confirm it is firmly attached.

By following these expert tips, you can easily replace the third brake light on your Range Rover, enhancing both the safety and appearance of your vehicle. Don’t compromise on road safety – revamp your ride today!
Illuminate Your Style: Discover the Latest Trends in Range Rover Third Brake Light Replacements
Are you tired of the same old look of your Range Rover? Want to add a touch of style and sophistication to your vehicle? Look no further! In this article, we will explore the latest trends in Range Rover third brake light replacements that will illuminate your style and make heads turn wherever you go.
When it comes to enhancing the aesthetics of your Range Rover, paying attention to even the smallest details can make a big difference. The third brake light, located at the center of the rear windshield, is often overlooked, but it can be a real game-changer in terms of style and safety. Not only does it serve as an additional safety feature, but it also creates an opportunity to add a unique flair to your vehicle.
One of the hottest trends in Range Rover third brake light replacements is the use of LED technology. LED lights offer several advantages over traditional incandescent bulbs. They are brighter, more energy-efficient, and have a longer lifespan, ensuring that your brake light will shine brightly for years to come. Additionally, LED lights come in a variety of colors, allowing you to customize your Range Rover and match its overall theme.
Another popular trend is smoked or tinted brake lights. These lights give your Range Rover a sleek and mysterious look while maintaining functionality. The darkened appearance adds a touch of sophistication and can complement any vehicle color. Whether you prefer a subtle tint or a darker shade, smoked brake lights are sure to elevate your style quotient.
For those who want to make a bold statement, there are options like sequential LED brake lights. These lights feature a dynamic lighting pattern that adds a modern and eye-catching element to your Range Rover. As the name suggests, the LEDs illuminate one after another, creating a visually stunning effect that is sure to impress onlookers.
Upgrading your Range Rover’s third brake light is a fantastic way to enhance both its style and safety. Whether you opt for LED lights, smoked/tinted variations, or sequential LEDs, the latest trends in Range Rover third brake light replacements offer a plethora of options to suit your personal taste. So why wait? Illuminate your style today and let your Range Rover shine bright on the roads!
Shedding Light on Safety: Why Proper Replacement of Range Rover Third Brake Lights Matters
When it comes to vehicle safety, every component plays a crucial role, and one such important element is the third brake light. In this article, we will shed light on why the proper replacement of Range Rover third brake lights matters. So, let’s dive in!
Firstly, what exactly is a third brake light? It’s the high-mounted brake light that is positioned at the center or top of the rear windshield of your Range Rover. Its purpose is to provide an additional warning signal to other drivers when you apply the brakes. This extra visibility can significantly reduce the chances of rear-end collisions, especially in situations where the following driver might not notice the standard brake lights.
Now, why is it essential to replace the Range Rover third brake light correctly? Well, there are a few key reasons.
Safety is the paramount concern. A malfunctioning or non-functional third brake light compromises your safety on the road. Without this crucial warning signal, drivers behind you may not be aware that you’re slowing down or coming to a stop, leading to potentially hazardous situations. By ensuring the proper replacement of the third brake light, you maintain optimal safety standards and minimize the risk of accidents.

Moreover, third brake lights are often subject to legal requirements. Many jurisdictions mandate the presence and functionality of the third brake light, considering it a critical safety feature. Failure to comply with these regulations can result in penalties, citations, or even failing a vehicle inspection. So, by replacing the third brake light properly, you not only protect yourself but also remain compliant with the law.
In addition to safety and legal aspects, a well-functioning third brake light reflects positively on your vehicle’s overall condition. It shows that you pay attention to maintenance and take pride in keeping your Range Rover in excellent shape. When all the components work flawlessly, it enhances the visual appeal and value of your vehicle.
To sum it up, the proper replacement of Range Rover third brake lights is of utmost importance for safety, legal compliance, and the overall impression of your vehicle. So, don’t overlook this vital aspect and ensure that you have a fully functional and properly installed third brake light to illuminate the road and safeguard yourself and others on your journeys.
DIY or Professional Help? The Pros and Cons of Range Rover Third Brake Light Replacement
Are you tired of driving around with a malfunctioning third brake light on your Range Rover? You’re not alone. The third brake light is a crucial safety feature that alerts drivers behind you when you’re braking, so it’s essential to keep it in proper working order. When faced with a broken or faulty third brake light, many Range Rover owners wonder whether they should attempt a DIY replacement or seek professional help. In this article, we’ll explore the pros and cons of both options to help you make an informed decision.
Let’s start with the do-it-yourself (DIY) route. One significant advantage of replacing the third brake light on your own is cost savings. Hiring a professional can be expensive, especially if you have an older Range Rover model. With some basic tools and a bit of patience, you can tackle the replacement process yourself and avoid labor costs.
Another benefit of the DIY approach is the satisfaction and sense of accomplishment that comes with successfully completing a task. If you enjoy working on your vehicle and have some experience with automotive repairs, replacing the third brake light can be a rewarding project. It allows you to have full control over the process and gives you the opportunity to learn more about your Range Rover.
However, there are some downsides to consider as well. First and foremost is the risk of making mistakes during the installation process. A minor error could lead to improper functioning or even damage to the new brake light. Additionally, if your Range Rover is still under warranty, attempting a DIY replacement may void the warranty if not done correctly.
On the other hand, opting for professional help has its advantages too. Professional technicians have the expertise and experience to handle brake light replacements efficiently. They can quickly diagnose any underlying issues and ensure a proper installation. Furthermore, if your Range Rover is still covered by warranty, having the third brake light replaced by a certified technician will protect your warranty rights.
However, professional assistance comes at a price. Labor costs can be high, especially if you go to a dealership or specialized repair shop. Additionally, scheduling an appointment and waiting for the repair to be completed may cause some inconvenience.
The decision between DIY or professional help for Range Rover third brake light replacement depends on various factors such as your budget, level of experience, and warranty coverage. If you’re confident in your skills and want to save money, the DIY option can be a viable choice. On the other hand, if you value efficiency and warranty protection, seeking professional assistance is recommended. Ultimately, choose the option that best aligns with your needs and priorities.