Looking to replace the third brake light on your Mini Cooper Convertible? We’ve got you covered! The third brake light plays a crucial role in enhancing safety on the road, as it alerts drivers behind you when you apply the brakes. In this article, we’ll guide you through the process of replacing the third brake light in your Mini Cooper Convertible, ensuring you can hit the road with confidence.
First things first, gather the necessary tools for the job. You’ll need a screwdriver (usually a Phillips head), a trim removal tool, and a replacement third brake light assembly that matches your Mini Cooper Convertible’s specifications. Once you have these items ready, you’re all set to begin.
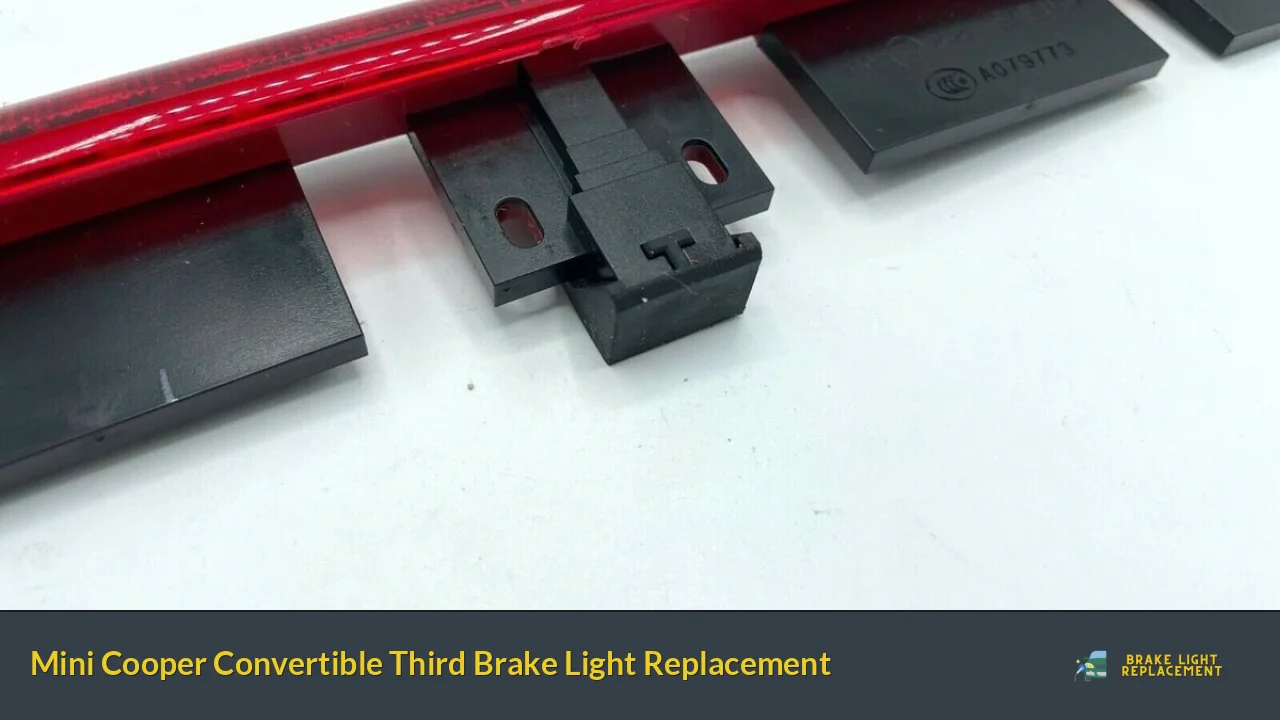
Start by locating the third brake light on the rear of your Mini Cooper Convertible. It’s typically positioned at the top center of the rear window. Using the trim removal tool, carefully pry off the plastic cover that surrounds the third brake light assembly. Be gentle to avoid any damage to the surrounding area.
Next, you’ll notice screws or bolts holding the third brake light assembly in place. Use the appropriate screwdriver to remove them. Keep track of the screws/bolts, as you’ll need them when installing the new assembly.
With the screws/bolts removed, gently pull the old third brake light assembly away from the vehicle. You may need to apply some force, but be cautious not to exert too much pressure or cause any harm to the wiring connected to the assembly.
Disconnect the wiring harnesses from the old assembly, ensuring you remember how they were connected for the installation of the new one. Once disconnected, remove the old assembly completely.
Now it’s time to install the fresh third brake light assembly. Begin by connecting the wiring harnesses, following the same arrangement as the previous assembly. Ensure a secure connection is made.
Carefully position the new assembly in place, aligning the screw/bolt holes with the corresponding ones on your Mini Cooper Convertible. Insert and tighten the screws/bolts to secure the assembly firmly.
Lastly, replace the plastic cover by fitting it back onto the assembly. Apply gentle pressure until it snaps into place, ensuring a snug fit.
Congratulations! You have successfully replaced the third brake light on your Mini Cooper Convertible. Remember to test the functionality of the new assembly by pressing the brakes and confirming that it illuminates properly.
Take pride in maintaining the safety features of your vehicle, and enjoy hitting the open road with peace of mind knowing your Mini Cooper Convertible is equipped with a fully functioning third brake light.
Revamp Your Ride: DIY Guide to Mini Cooper Convertible Third Brake Light Replacement
Are you an avid Mini Cooper Convertible owner looking to give your ride a fresh and revamped look? One essential element to consider is the third brake light. If your third brake light is dim, cracked, or not functioning properly, it’s time for a replacement. In this DIY guide, we’ll walk you through the steps to replace the third brake light on your Mini Cooper Convertible, giving your car a stylish and functional upgrade.

Step 1: Gather the Necessary Tools
Before diving into the replacement process, ensure you have the required tools handy. You’ll need a screwdriver (usually a Torx or Phillips head), a flathead screwdriver for prying, a clean cloth, and a new compatible third brake light assembly.
Step 2: Accessing the Third Brake Light Assembly
To access the third brake light assembly, open the trunk of your Mini Cooper Convertible. Locate the plastic covers or carpeting near the third brake light area. Gently remove these covers using a flathead screwdriver, exposing the brake light housing.

Step 3: Removing the Old Brake Light Assembly
Using the appropriate screwdriver, carefully unscrew the screws holding the old brake light assembly in place. Keep them in a safe place to avoid misplacement. Once the screws are removed, gently detach the assembly from its position.
Step 4: Installing the New Brake Light Assembly
Take your new third brake light assembly and align it with the vacant space left by the old one. Securely fasten the screws back into place, ensuring the assembly is tightly attached.
Step 5: Testing the New Brake Light
After successfully installing the new third brake light assembly, it’s crucial to test its functionality. Ask a friend or family member to step on the brakes while you observe the newly replaced brake light. Ensure it illuminates correctly with each application of the brakes.
By following these simple steps, you can easily replace the third brake light on your Mini Cooper Convertible. With a new and fully functional brake light in place, you’ll not only enhance your car’s safety but also add a touch of style to your ride. So, get started on revamping your Mini Cooper Convertible today!
Shining Bright: Discover the Latest Innovations in Mini Cooper Convertible Third Brake Lights

Are you ready to hit the road in style? Get ready to discover the latest innovations in Mini Cooper Convertible third brake lights that will make your car shine bright and turn heads wherever you go. These small but impactful additions to your Mini Cooper Convertible are designed to enhance both safety and style.
Imagine cruising down the highway on a sunny day, with the wind in your hair and the sun on your face. Now picture your Mini Cooper Convertible equipped with a state-of-the-art LED third brake light, illuminating the road behind you with its vibrant glow. This innovative lighting solution not only grabs attention but also enhances visibility, ensuring that other drivers can easily spot your car, even in challenging conditions.
The newest generation of Mini Cooper Convertible third brake lights boasts cutting-edge technology that goes beyond mere illumination. Some models feature dynamic lighting patterns that add an extra touch of sophistication to your vehicle. With these lights, your Mini Cooper Convertible becomes a moving work of art, with a mesmerizing sequence of lights that captures everyone’s gaze.
But it’s not just about aesthetics. Safety is a top priority, and Mini Cooper understands that. That’s why the latest third brake lights come with advanced features such as automatic intensity adjustment. This means that the brightness of the brake lights adjusts according to the surrounding light conditions, ensuring optimal visibility at all times.
Installation is a breeze too. The Mini Cooper Convertible third brake lights are specifically designed to fit seamlessly into the existing framework of your car, without any modifications required. With just a few simple steps, you can upgrade your Mini Cooper and enjoy the benefits of these innovative lights.
Safety with Style: Upgrading Your Mini Cooper Convertible’s Third Brake Light
When it comes to driving in style, the Mini Cooper Convertible stands out from the crowd. Its sleek design and zippy performance make it a favorite among car enthusiasts. But while enjoying the wind in your hair and the thrill of the open road, it’s important not to overlook safety. One key safety feature that often goes unnoticed is the third brake light.
The third brake light, also known as the center high-mounted stop lamp (CHMSL), plays a crucial role in alerting drivers behind you when you apply the brakes. It’s positioned higher than the regular brake lights, making it more visible to other motorists. Upgrading your Mini Cooper Convertible’s third brake light can enhance both safety and style.
So, why should you consider upgrading? Firstly, it offers improved visibility. The stock third brake light might be functional, but upgrading to an LED version provides increased brightness and clarity. This ensures that your braking intentions are clearly communicated to drivers following you, reducing the risk of rear-end collisions.
In addition to better visibility, upgrading your third brake light allows you to add a touch of personal style to your Mini Cooper Convertible. There are various aftermarket options available, ranging from sleek smoked lenses to vibrant LED patterns. You can choose a design that complements your car’s aesthetics and reflects your individuality. With these stylish upgrades, your Mini Cooper Convertible will not only turn heads on the road but also prioritize safety.
But safety and style don’t have to come at a high cost. Upgrading your Mini Cooper Convertible’s third brake light is a relatively affordable modification that can make a big impact. Many aftermarket options are easy to install, requiring minimal tools and time. With just a few simple steps, you can transform your car’s appearance and enhance its safety features without breaking the bank.
Upgrading your Mini Cooper Convertible’s third brake light is a smart choice for those who prioritize safety without compromising on style. By improving visibility and adding a personal touch, you can make your Mini Cooper Convertible stand out on the road while ensuring that you and your fellow drivers stay safe. So, why wait? Upgrade your third brake light today and enjoy a safer, more stylish driving experience.
Expert Tips and Tricks: How to Effortlessly Replace Your Mini Cooper Convertible’s Third Brake Light
Are you tired of the hassle involved in replacing your Mini Cooper Convertible’s third brake light? Well, fret no more! In this article, we’ll provide you with expert tips and tricks that will make this task effortless. Replacing the third brake light may seem daunting, but with the right guidance, you’ll be able to do it like a pro.
Firstly, let’s gather the necessary tools for the job. You’ll need a screwdriver, preferably a Phillips head, and a replacement bulb specifically designed for your Mini Cooper Convertible’s third brake light. Once you have these tools ready, you’re all set to begin.
Start by locating the third brake light assembly on the rear deck lid of your Mini Cooper Convertible. It is usually positioned in the center or towards the top. Once located, carefully remove the screws securing the assembly using your screwdriver. Keep track of the screws to avoid misplacing them during the process.
With the screws removed, gently pull the assembly away from the deck lid. Be cautious not to apply excessive force as it might damage the surrounding components. Once the assembly is detached, you’ll notice the bulb socket connected to the wiring harness. Twist the socket counterclockwise to unlock it and remove the old bulb.
Now, it’s time to install the new bulb. Insert it into the socket and give it a slight twist clockwise to secure it in place. Make sure it is properly seated and aligned. Once done, reconnect the bulb socket to the wiring harness by twisting it clockwise until it locks.
With the new bulb in place, carefully position the assembly back onto the deck lid. Align the screw holes and insert the screws you removed earlier. Tighten them firmly, but avoid over-tightening to prevent any damage.
And there you have it! By following these expert tips and tricks, you’ve effortlessly replaced your Mini Cooper Convertible’s third brake light. Now you can enjoy the enhanced safety and stylish appearance of a fully functional brake light. So go ahead, give it a try, and impress your friends with your newfound automotive skills!