Are you tired of a dim or faulty brake light on your Jeep Liberty? Don’t worry, because replacing the brake light bulb is easier than you might think. In this article, we will guide you through the process of replacing the brake light bulb in your Jeep Liberty, ensuring that your vehicle remains safe and visible on the road.
When it comes to brake light bulb replacement, you’ll be pleased to know that no specialized tools are required. All you need is a replacement bulb and a few minutes of your time. So let’s dive right in!
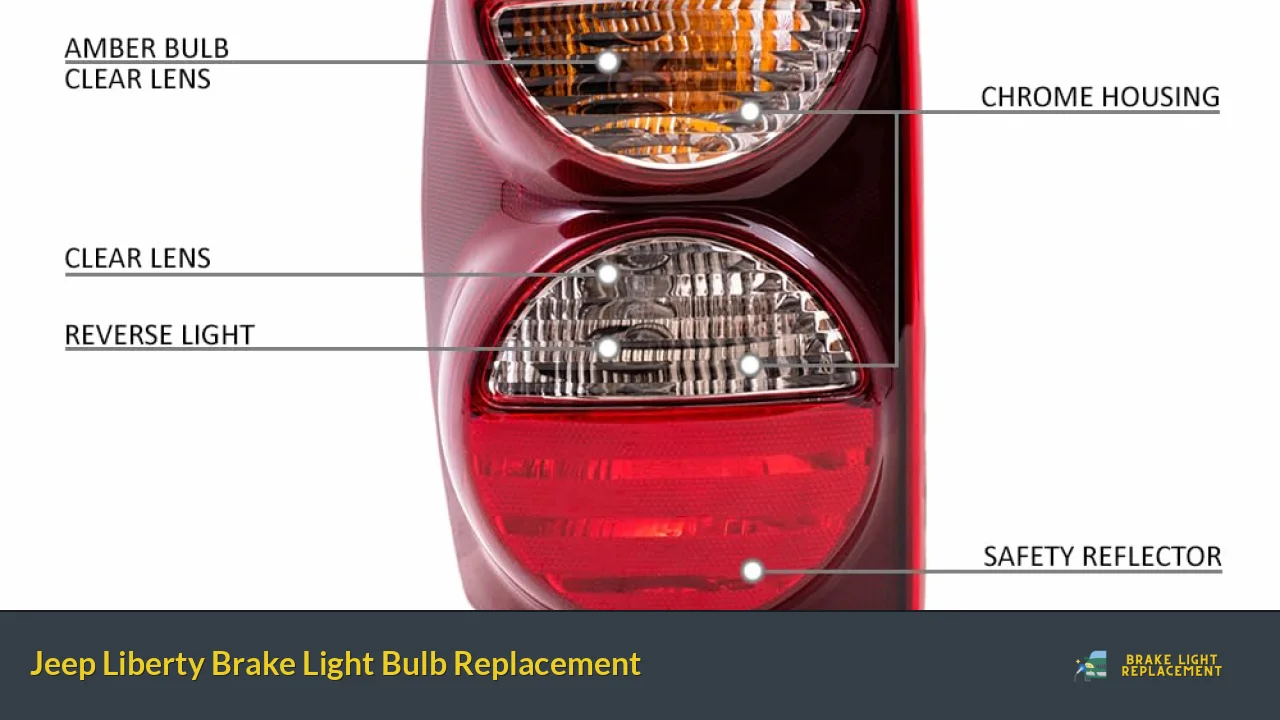
First, locate the brake light housing on your Jeep Liberty. It is typically located at the rear of the vehicle, near the edge of the trunk or tailgate. Once you’ve identified the housing, you can proceed with the replacement process.
To access the brake light bulb, you may need to remove a cover or panel. This can usually be done by gently prying it off with a flathead screwdriver or your fingers. Take care not to apply excessive force to avoid damaging the housing or cover.
Once the cover is removed, you’ll have clear visibility of the brake light bulb. Grasp the bulb socket and twist it counterclockwise to remove it from the housing. The bulb should come out easily once it has been unscrewed.
Now, take your new brake light bulb and insert it into the socket. Ensure that the bulb is properly aligned before twisting it clockwise to secure it in place. Once the bulb is securely installed, you can reattach the cover or panel that you previously removed.
Congratulations! You’ve successfully replaced the brake light bulb on your Jeep Liberty. Before hitting the road, test the new bulb by turning on your vehicle’s headlights and stepping on the brake pedal. Confirm that the brake light illuminates brightly and consistently.
Remember, a functioning brake light is crucial for your safety and the safety of other drivers. If you encounter any issues during the replacement process or if the brake light continues to malfunction, it is recommended to consult a professional mechanic for further assistance.

Replacing the brake light bulb on your Jeep Liberty is a simple task that you can accomplish with minimal effort. By following these steps, you can ensure that your brake light functions optimally, providing clear visibility and enhancing safety on the road.
Revamp Your Ride: Discover the Latest Tips for Jeep Liberty Brake Light Bulb Replacement
Are you looking to revitalize your Jeep Liberty and ensure proper road safety? One crucial aspect that often gets overlooked is the brake light bulb. A functional brake light is essential for signaling your intentions to other drivers on the road. If you’re experiencing issues with your Jeep Liberty’s brake light bulb, don’t worry! In this article, we will provide you with the latest tips on how to replace it effectively.
Firstly, let’s talk about the importance of a brake light bulb replacement. The brake light serves as a warning signal to inform drivers behind you when you’re slowing down or coming to a stop. A faulty brake light bulb can lead to accidents, as other drivers may not be aware of your actions. Hence, it’s crucial to regularly inspect and replace your brake light bulb as needed.
Now, let’s dive into the process of replacing the brake light bulb in your Jeep Liberty. To begin, locate the rear brake light assembly on your vehicle. Depending on the year and model of your Jeep Liberty, the location may vary slightly. Generally, you’ll find it at the back of the vehicle, near the trunk or hatch.
Once you’ve located the brake light assembly, gently remove the lens cover by unscrewing the retaining screws or releasing the clips. Be cautious not to damage the lens or surrounding components during this step. After removing the lens cover, you’ll have direct access to the brake light bulb socket.
Next, carefully detach the old brake light bulb from the socket by twisting it counterclockwise. Take note of the bulb type and wattage to ensure you purchase the correct replacement. You can find this information in your vehicle’s manual or consult an automotive parts specialist.
After obtaining the new brake light bulb, insert it into the socket by twisting it clockwise until it locks securely. Once in place, reattach the lens cover by reversing the removal process. Double-check that all screws are tightened or clips are securely fastened.
Ensuring your Jeep Liberty’s brake light bulb is in optimal condition is crucial for road safety. By following the steps outlined above, you can easily replace a faulty brake light bulb and revamp your ride. Remember to exercise caution during the replacement process and consult professional assistance if needed. Drive safely and enjoy your enhanced driving experience with a properly functioning brake light!
Illuminate Your Path: Expert Advice on Upgrading Jeep Liberty Brake Light Bulbs
Are you tired of driving in the dark, uncertain if your brake lights are properly illuminating the road behind you? Worry no more! In this article, we will provide you with expert advice on upgrading your Jeep Liberty brake light bulbs. With these valuable tips, you’ll be able to illuminate your path and ensure a safer driving experience.
When it comes to brake light bulbs, choosing the right type is crucial. LED (Light Emitting Diode) bulbs are highly recommended for their superior brightness and longevity. Unlike traditional incandescent bulbs, LEDs offer a rapid response time, meaning they illuminate instantly when you apply the brakes. This quick reaction can make a significant difference in preventing rear-end collisions.
To begin the upgrade process, locate the brake light housing on your Jeep Liberty. This can usually be found at the rear of the vehicle, near the taillights. Gently remove the housing cover by unscrewing or unclipping it, depending on the model. Take care not to damage any wires during this step.
Next, you’ll need to remove the old bulbs. Simply twist the bulb socket counterclockwise and carefully pull it out. Dispose of the old bulbs responsibly, as they may contain hazardous materials.
Now it’s time to install the new LED bulbs. Insert them into the empty sockets, ensuring a secure fit. Give them a gentle twist clockwise to lock them in place. Reattach the brake light housing cover, making sure it is snug and properly aligned.
Once you’ve completed the installation, test your new brake lights. Ask a friend or family member to observe as you press the brake pedal. Admire the impressive brightness and responsiveness of your upgraded LED bulbs!
In summary, upgrading your Jeep Liberty brake light bulbs to LED is a wise decision for enhanced safety and visibility. Follow the simple steps outlined in this article, and you’ll be on your way to illuminating your path like never before. Drive with confidence, knowing that your brake lights are shining brightly and keeping you safe on the road.
Brighter, Safer Journeys: The Ultimate Guide to Replacing Jeep Liberty Brake Light Bulbs
Are you tired of driving with dim or non-functioning brake lights on your Jeep Liberty? Don’t worry, we’ve got you covered! In this ultimate guide, we will walk you through the process of replacing your Jeep Liberty’s brake light bulbs, ensuring brighter and safer journeys for you and those around you.
When it comes to brake light bulb replacement, the first step is to gather the necessary tools. You’ll need a replacement brake light bulb that matches the specifications of your Jeep Liberty, typically a 3157 bulb. Additionally, have a screwdriver, gloves, and a clean cloth handy.
Start by opening the rear hatch of your Jeep Liberty. Locate the brake light housing assembly inside. Using the screwdriver, remove the screws securing the housing to the vehicle. Carefully detach the housing from the vehicle body.
Once the housing is free, you’ll see the brake light bulb socket. Gently twist the socket counterclockwise until it unlocks from the housing. Then, carefully pull the socket out of the housing, exposing the old bulb.
To remove the old bulb, simply pull it straight out from the socket. Be cautious not to squeeze or apply excessive force, as it may damage the bulb. If the bulb appears blackened or broken, it’s definitely time for a replacement.
Now it’s time to install the new brake light bulb. Take the new bulb and align its prongs with the corresponding slots in the socket. Gently push the bulb into the socket until it fits securely.

With the new bulb in place, insert the socket back into the brake light housing. Rotate it clockwise to lock it into position. Ensure a tight fit to prevent any moisture from seeping in.
Next, reattach the brake light housing to the vehicle body by aligning the screw holes and using the screws you removed earlier. Tighten them snugly, but avoid over-tightening.
Finally, test your newly installed brake light bulb by having someone press the brake pedal while you observe from outside the vehicle. If the light illuminates brightly, congratulations! You’ve successfully replaced your Jeep Liberty’s brake light bulb.
Remember, maintaining properly functioning brake lights is crucial for your safety on the road. By following this ultimate guide, you can easily replace your Jeep Liberty’s brake light bulbs and enjoy brighter, safer journeys. Stay vigilant and never overlook the importance of well-functioning brake lights.
Shedding Light on Safety: Must-Know Steps for Jeep Liberty Brake Light Bulb Replacement
Are you tired of struggling with a faulty brake light bulb in your Jeep Liberty? Fret not, because we’re here to shed some light on the matter and guide you through the must-know steps for a smooth and hassle-free replacement. So buckle up and let’s get started!
When it comes to replacing your Jeep Liberty’s brake light bulb, safety should always be your top priority. Before diving into the process, make sure to park your vehicle on a level surface and engage the parking brake. This will prevent any accidental rolling or movement while you work on the brake light.
Now, let’s get our hands dirty! Start by opening the rear liftgate to access the area behind the taillight assembly. You’ll find a couple of screws or nuts securing the taillight to the body of the vehicle. Use the appropriate tool, such as a screwdriver or a wrench, to remove these fasteners. Once they’re loose, gently pull the taillight assembly away from the vehicle.

With the taillight assembly in your hands, locate the socket that holds the brake light bulb. Give it a counterclockwise twist to release it from the assembly. Be careful not to apply too much force, as excessive pressure might damage the socket or bulb.
Now comes the moment of truth – removing the old bulb. Grasp it firmly but gently, and give it a slight wiggle to loosen it from the socket. Once it’s free, carefully pull it straight out. You might need to use a slight rocking motion if it feels stuck.
Congratulations! You’ve successfully removed the old brake light bulb. Now it’s time to install the new one. Take the replacement bulb and insert it into the socket, making sure it fits snugly. Avoid touching the glass part of the bulb with your bare hands, as the oils from your skin can cause premature failure.
Once the new bulb is securely in place, it’s time to reassemble everything. Insert the socket back into the taillight assembly and give it a clockwise twist to lock it in position. Now, carefully align the taillight assembly with the vehicle’s body and secure it using the screws or nuts you removed earlier.
And there you have it – a job well done! You’ve shed some light on safety by successfully replacing the brake light bulb in your Jeep Liberty. Now you can hit the road with confidence, knowing that your brake lights are shining bright for all to see.
Remember, if you’re unsure about any step of the process or encounter any difficulties, it’s always best to consult your vehicle’s manual or seek professional assistance. Safety should never be compromised when it comes to working on your vehicle.