When brake lights malfunction, it poses a significant safety risk on the road. Understanding how to fix brake light wiring is essential for vehicle owners who wish to ensure their cars are safe and compliant with traffic laws. This guide will provide a comprehensive overview of diagnosing and repairing brake light wiring issues, covering common problems, necessary tools, and step-by-step instructions.
Common Brake Light Issues Potential Causes Brake lights not illuminating Blown bulbs, faulty switch, wiring issues Brake lights stay on Stuck switch, wiring short One brake light out Burnt bulb, corroded socket
Understanding Brake Light Wiring
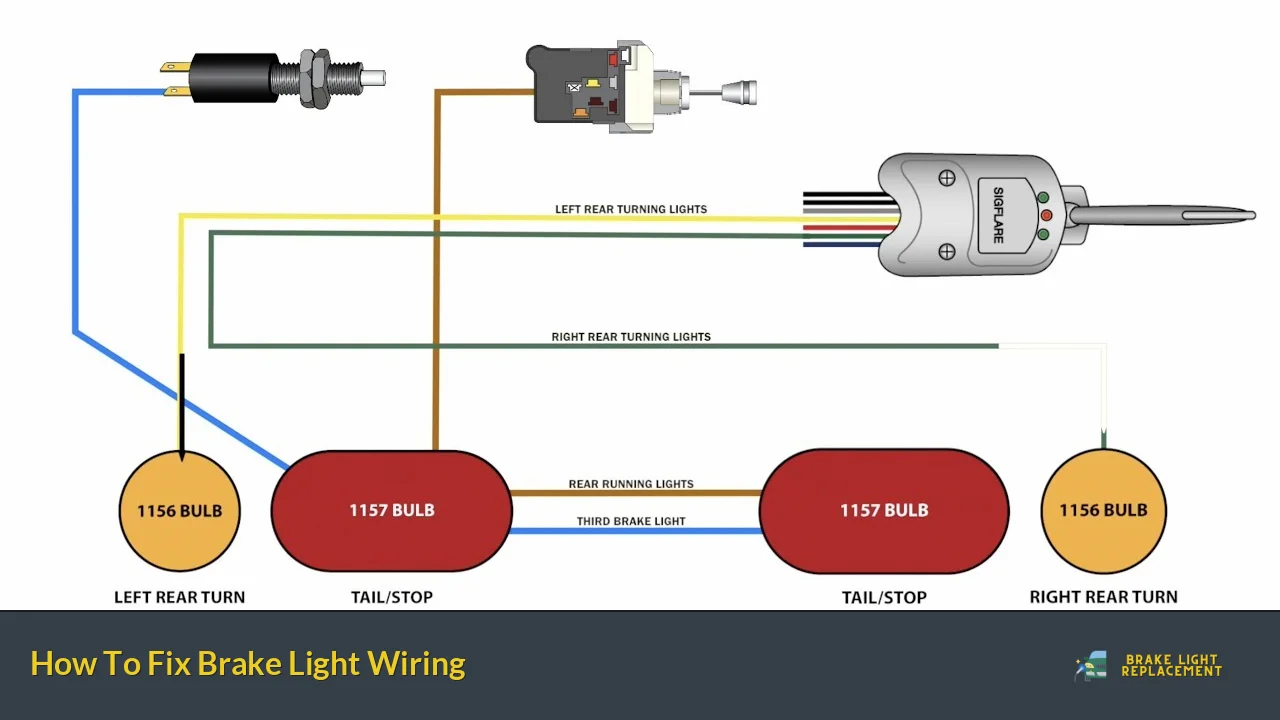
Brake light wiring is a critical component of a vehicle’s electrical system. The wiring connects the brake light bulbs to the brake light switch, which activates the lights when the brake pedal is pressed. Typically, the system involves several key elements: the brake light switch, wiring harness, bulbs, and fuses.
When you press the brake pedal, the brake light switch closes the circuit, allowing electricity to flow to the bulbs. If any part of this system fails—be it a blown bulb or a frayed wire—the brake lights may not function correctly. Common symptoms include lights that do not illuminate, stay lit when they shouldn’t, or flicker intermittently.
Diagnosing these issues requires a systematic approach. Start by checking the simplest components first, such as the bulbs and fuses, before moving on to more complex elements like the wiring and switches.
Tools Needed for Repair
Before beginning any repairs on your brake light wiring, it’s crucial to gather the necessary tools. Having everything on hand will streamline the process and help prevent delays. Here’s a list of essential tools you’ll need:
- Multimeter or test light for checking electrical connections
- Wire strippers for removing insulation from wires
- Electrical tape for insulating repaired wires
- Replacement bulbs if needed
- Screwdrivers for removing tail light assemblies
- Pliers for gripping and twisting wires
Important info: Ensure your vehicle is turned off and parked safely before starting any electrical work to avoid accidents.
Diagnosing Brake Light Issues
To effectively fix brake light wiring problems, you must first diagnose what’s wrong. Follow these steps to identify common issues:
1. Check the Bulbs: Start by inspecting each bulb in your brake lights. If one or more bulbs are burnt out, replace them with new ones.
2. Inspect Fuses: Locate your vehicle’s fuse box and check for blown fuses related to the brake lights. Replace any blown fuses with ones of the same amperage.
3. Examine Wiring Connections: Inspect all visible wiring for signs of wear or damage. Look for frayed wires, loose connections, or corrosion at connectors.
4. Test the Brake Light Switch: The switch is usually located near the top of the brake pedal assembly. Use a multimeter to check if it’s functioning correctly when you press the pedal.
5. Check Ground Connections: Ensure that all ground connections are secure and free from rust or corrosion. A poor ground can prevent lights from functioning properly.
By systematically checking these components, you can often pinpoint where the problem lies in your brake light system.
Repairing Brake Light Wiring
Once you have diagnosed the issue with your brake lights, it’s time to proceed with repairs. Here’s how to tackle common problems:
Replacing Brake Light Bulbs
If you find that a bulb is burnt out:
- Open the trunk or access panel to reach the tail light assembly.
- Remove any screws or clips holding the assembly in place.
- Twist and pull out the old bulb from its socket.
- Insert a new bulb into the socket and reassemble everything securely.
Fixing Blown Fuses
If you’ve identified a blown fuse:
- Locate the fuse box as per your vehicle’s manual.
- Remove the blown fuse using pliers if necessary.
- Replace it with a new fuse of identical amperage.
Important info: Always replace fuses with ones that match their specified amperage to avoid further electrical issues.
Repairing Damaged Wiring
For frayed or damaged wires:
- Cut away any damaged sections using wire cutters.
- Strip insulation from both ends of each wire using wire strippers.
- Twist together corresponding wires (e.g., black to black).
- Secure connections with electrical tape or solder them for better durability.
Replacing Brake Light Switch
If your tests indicate that the brake light switch is faulty:
- Disconnect the battery to ensure safety.
- Locate and remove any screws securing the switch in place.
- Disconnect the wiring harness from the old switch.
- Install a new switch by connecting it in reverse order and securing it properly.
Preventative Maintenance Tips
To avoid future issues with your brake light wiring:
- Regularly check bulbs and fuses during routine maintenance.
- Inspect wiring for signs of wear or damage during oil changes or tire rotations.
- Apply dielectric grease to bulb sockets to prevent corrosion caused by moisture.
By implementing these preventative measures, you can extend the life of your brake light system and enhance overall vehicle safety.
FAQs About How To Fix Brake Light Wiring
- What should I do if my brake lights won’t turn off?
Check if your brake light switch is stuck or malfunctioning. - How can I tell if my brake light switch is faulty?
If both brake lights fail simultaneously, it’s likely due to a bad switch. - Can I replace my own brake light bulbs?
Yes, replacing bulbs is generally straightforward and can be done without professional help. - What tools do I need to fix my brake lights?
A multimeter, wire strippers, electrical tape, and screwdrivers are essential tools. - Is it safe to drive with broken brake lights?
No, driving without functioning brake lights poses serious safety risks.
By following this guide on how to fix brake light wiring issues, you can ensure that your vehicle remains safe and compliant on the road. Regular maintenance and timely repairs will help keep your braking system functioning properly for years to come.