Are you tired of driving around with a faulty brake light on your Honda Civic? Don’t worry, because in this article, we’ll guide you through the process of replacing your brake light, ensuring your safety on the road and avoiding any unnecessary trouble. So let’s get started!
When it comes to brake light replacement, the Honda Civic provides a fairly straightforward procedure. First things first, you’ll need to gather the necessary tools for the job. Grab a screwdriver and a replacement bulb specifically designed for your Honda Civic model. Having these handy will save you time and ensure an efficient replacement process.
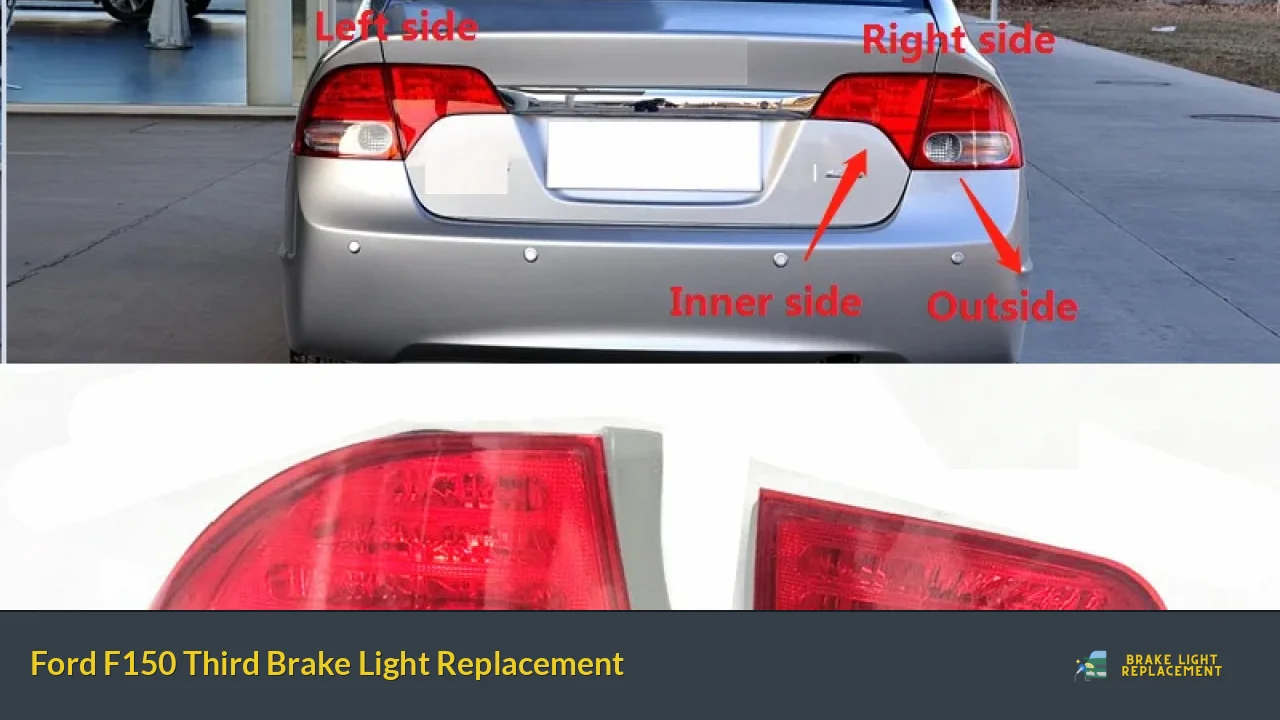
Now that you have your tools ready, locate the rear brake light assembly on your Honda Civic. This is usually positioned on the trunk lid, easily accessible from the inside. Once you’ve found it, you’ll notice a plastic cover protecting the bulb. Use your screwdriver to carefully remove the screws holding the cover in place.
With the cover removed, you can now access the faulty bulb. Gently twist the bulb socket counterclockwise and pull it out. Take note of the bulb’s position and make sure to disconnect it properly without causing any damage.

Next, grab your brand-new replacement bulb and insert it into the socket. Give it a slight clockwise twist to secure it in place. Now, it’s time to test your newly installed brake light. Have someone step on the brakes while you observe if the light illuminates correctly. If everything looks good, proceed to reattach the plastic cover by tightening the screws.
Congratulations! You have successfully replaced the brake light on your Honda Civic. Remember, maintaining functional brake lights is crucial for your safety on the road, as they provide clear signals to other drivers when you’re slowing down or stopping. Regularly check your brake lights to ensure they are in working order, and don’t hesitate to replace them promptly if needed.
Revamp Your Ride’s Safety: Discover Quick and Easy Steps for Honda Civic Brake Light Replacement
Are you tired of driving around with malfunctioning brake lights? Worried about your safety on the road? Well, fret no more! In this article, we will guide you through quick and easy steps to revamp your ride’s safety by replacing the brake lights in your Honda Civic. By the end, you’ll be equipped with the knowledge to tackle this task like a pro.
First things first, let’s gather the necessary tools for the job. You’ll need a replacement bulb that matches the specifications of your Honda Civic’s brake lights. Typically, this would be a 12-volt, 21-watt bulb. Additionally, grab a screwdriver and a clean cloth for handling the new bulb.
Now, let’s get down to business. Start by accessing the brake light housing from the trunk of your Honda Civic. Locate the plastic cover inside the trunk directly behind the brake light assembly. Gently remove the cover by unscrewing or unclipping it, depending on the model.
With the cover off, you’ll have clear access to the bulb socket. Carefully disconnect the electrical connector from the socket. Next, rotate the bulb socket counterclockwise to unlock it. Once unlocked, you can easily remove the old bulb from its socket.
Take a moment to inspect the socket for any signs of damage or corrosion. If you spot any, it’s advisable to replace the entire socket assembly to ensure optimal performance.
Now, it’s time to install the new bulb. Avoid touching the glass envelope of the bulb directly, as oils from your fingers can cause premature failure. Instead, use the clean cloth to handle the new bulb. Insert it into the socket and give it a slight twist clockwise to lock it in place.
Before reassembling everything, take a moment to test the brake light to ensure it’s functioning properly. Have someone press the brake pedal while you observe the newly installed bulb from the rear of the vehicle. If it lights up, congratulations! You’ve successfully replaced your Honda Civic’s brake light.
Revamping your ride’s safety by replacing the brake lights in your Honda Civic is a quick and easy task. By following these simple steps, you can ensure that your brake lights are functioning optimally, enhancing your safety on the road. So don’t delay, give your Honda Civic the attention it deserves and enjoy peace of mind during your travels.
Stay Road-Ready with Step-by-Step Guide on Replacing Honda Civic Brake Lights
Are you tired of driving around with a busted brake light on your Honda Civic? Not only is it unsafe, but it can also get you into trouble with law enforcement. Don’t worry! In this step-by-step guide, we’ll walk you through the process of replacing your Honda Civic brake lights, ensuring that you stay road-ready and safe.
First things first, gather the necessary tools for the job. You’ll need a replacement bulb (make sure it’s compatible with your Honda Civic model), a screwdriver, and maybe even some gloves to protect your hands. Once you have everything ready, let’s get started!
Step 1: Locate the brake light housing
To access the brake light bulb, open the trunk of your Honda Civic. Look for the plastic housing directly behind the brake light lens. You may need to remove any covering or trim to expose the housing.

Step 2: Remove the housing screws
Using a screwdriver, carefully remove the screws holding the brake light housing in place. Keep these screws in a safe place; you’ll need them later when reinstalling the new bulb.
Step 3: Replace the old bulb
Once the screws are removed, gently pull the brake light housing away from the car. You should see the old bulb socket connected to the wiring harness. Twist the socket counterclockwise to release it, and then carefully remove the old bulb.
Step 4: Install the new bulb
Take your new bulb and insert it into the empty socket. Make sure it’s securely in place by giving it a gentle twist clockwise. Avoid touching the glass part of the bulb as it can decrease its lifespan or cause it to malfunction.
Step 5: Reassemble and test
Now it’s time to put everything back together. Reattach the brake light housing using the screws you set aside earlier. Once it’s secured, close the trunk and hop into the driver’s seat. Test your new brake light by pressing the pedal. If it illuminates as expected, congratulations! You’ve successfully replaced your Honda Civic brake lights.
Remember, having properly functioning brake lights is crucial for your safety on the road. By following this simple step-by-step guide, you can stay road-ready and ensure that your Honda Civic is equipped with fully operational brake lights. Enjoy your safe journeys!
Illuminate Your Drive: Expert Tips and Tricks for Effortless Honda Civic Brake Light Replacement
Are you tired of struggling with brake light replacement on your Honda Civic? Don’t worry, because in this article, we will provide you with expert tips and tricks to make the process effortless. Illuminating your drive has never been easier!
When it comes to replacing your Honda Civic’s brake lights, it is essential to have a clear understanding of the steps involved. First and foremost, gather all the necessary tools for the task at hand. You’ll typically need a screwdriver, new bulbs, and perhaps some gloves to protect your hands.
Once you’re ready, locate the brake light housing at the rear of your Honda Civic. This can usually be found inside the trunk or accessed from outside the vehicle. It may be secured with screws or clips, so remove them carefully using your trusty screwdriver. Keep an eye out for any specific instructions in your vehicle’s manual, as the process may vary slightly depending on the model year.
With the housing open, identify the faulty bulb that needs replacing. Gently twist it counterclockwise to remove it from its socket. Take note of the bulb’s size and type, ensuring you purchase a suitable replacement. Remember, using the correct bulb is crucial for optimal performance and safety.
Before inserting the new bulb, take a moment to inspect the socket for any signs of corrosion or damage. If necessary, clean the socket using a wire brush or contact cleaner to ensure a secure connection.
Now, it’s time to install the new bulb. Insert it into the socket and give it a firm clockwise twist to lock it in place. Test the brake light by pressing the brake pedal or having someone else help you while you observe the lights. Ensure that both the brake lights and the center high-mounted stop lamp are working correctly.

Finally, reassemble the brake light housing by securing it back in place with the screws or clips. Double-check that everything is tightly fastened to prevent any water or debris from entering.
Congratulations! You’ve successfully illuminated your drive with a seamless Honda Civic brake light replacement. Remember, if you encounter any difficulties or prefer professional assistance, don’t hesitate to consult an authorized Honda service center.
Light Up Your Style: Upgrade Your Honda Civic’s Look with a Brake Light Replacement
Are you tired of the ordinary, mundane look of your Honda Civic? Are you seeking a way to inject some style and personality into your beloved car? Look no further! In this article, we’ll explore how you can elevate your Honda Civic’s appearance by upgrading its brake lights. Yes, you heard it right – brake light replacement is the key to lighting up your style!
Brake lights are not just essential for safety; they also play a crucial role in enhancing the overall aesthetics of your vehicle. By opting for a brake light replacement, you can transform your Honda Civic into a head-turning masterpiece on wheels. Imagine cruising down the street with sleek and stylish brake lights that catch everyone’s attention.
One of the fantastic aspects of upgrading your Honda Civic’s brake lights is the wide variety of options available. Whether you prefer a modern, minimalist design or a bold and eye-catching look, there’s a brake light replacement to suit your personal style. You can choose from an array of shapes, sizes, and colors to create a customized appearance that truly reflects who you are.
The installation process for brake light replacements is typically straightforward and hassle-free. Many options are designed to be plug-and-play, which means you can easily replace your existing brake lights without complex wiring or modifications. In no time, you’ll have a brand-new set of lights illuminating your Honda Civic and elevating its visual appeal.
But it’s not just about looks – functionality matters too. Brake light replacements often feature advanced LED technology, providing brighter and more efficient illumination compared to standard bulbs. This ensures that your Honda Civic remains visible to other drivers, enhancing safety on the road.
Upgrade your Honda Civic’s look today by considering a brake light replacement. It’s a simple yet impactful modification that can make a world of difference in transforming your car’s style. Step out of the ordinary and let your Honda Civic shine with upgraded brake lights that truly reflect your unique personality and taste.